Q website FPT deploy
Quarto
Summary
1. Create New quarto project.
File > New Project > New directory > Quarto website > Browse: ~/Documents/GitHub/Quarto; dir name: descSPIM_LSmicro > create repository.
To wrap code in Rstudio:
//Code » Soft wrap long lines
Files:
- Renv »
- styles.css »
- _quarto.yml
- renv.lock
- about.qmd
- index.qmd
- Research_Notes_230601.Rproj
Files + hiden files:
.git».Rproj.user»- Renv »
- styles.css
- _quarto.yml
.gitignore- renv.lock
- about.qmd
- index.qmd
- Research_Notes_230601.Rproj
Render Q site files:
_site»- .git
.quarto- .Rproj.user
- renv
- styles.css
- _quarto.yml
- .gitignore
- .Rprofile
- renv.lock
- about.qmd
- index.qmd
- Research_Notes_230601.Rproj
Open files:
- index.qmd,
- _quarto.yml
Folder contains:
- styles.css
- about.qmd
- index.qmd
- descSPIM_LSmicro.Rproj
- _quarto.yml
2. Configure _quarto.yml file
Auto-completion works by pressing tab. Careful!! tab level influence auto-complation options. If in the wrong level, then option will not be found.
See:
Website Navigation Page Layout
2.1 Change output dir:
Change output form _site to docs.
project:
  type: website
  output-dir: docs
quarto.yml simple template-01:
project:
  type: website
  output-dir: docs

website:
  title: "Site_name"
  image: "" # where this images goes?
  favicon: "images/favicon.png" # Small icon in the bewbrowser tab (ex. uni logo)
  open-graph: true #https://quarto.org/docs/websites/website-tools.html, https://www.youtube.com/watch?v=QwEQKM4YRnU&t=2s
  #twitter-card: true
  search: true

  navbar:
    left:
      - href: index.qmd
        text: Home
      - about.qmd

format:
  html:
    fontsize: "5"
    toc: true
    toc-depth: 6
    theme:
      light: [cosmo, theme.scss]
      dark: [cosmo, theme-dark.scss] # change theme (cosmo) colors and formats in the scss files
    code-copy: true
    code-fold: true
    code-overflow: wrap
    code-block-bg: true
    code-block-border-left: "#31BAE9"
#    code-line-numbers: true

    css: styles.css
#    include-after-body: js.html
#    self-contained: false # If true, it will not create the site files but one html file.
#    grid:
#      sidebar-width: 250px
#      body-width: 900px
#      margin-width: 300px
#    tbl-colwidths: [40, 60]  # tables column withs 40% and 60%
  docx: default

editor: visual
quarto.yml simple template-02:
project:
  type: website
  output-dir: docs

website:
  title: "descSPIM_LSmicro"
  favicon: ""
  open-graph: true
  search: true
  navbar:
    background: light
    logo: ""
    logo-alt: ""
    logo-href: ""
    collapse-below: lg

    left:
      - href: index.qmd
        text: "Home"
      - href: about.qmd
        text: "About"
      - href: Software.qmd
        text: "Software"

      - text: "Protocols"
        menu:
          - href: supplementary/Protocols/Cubic/Cubic.qmd
            text: "Cubic"

      - text: "Supplementary"
        menu:
          - href: supplementary/3dimaging/index.qmd
            text: "3D Imaging"
          - href: supplementary/construction/index.qmd
            text: "Construction"
          - href: supplementary/OpticalAligment/OpticalAligment.qmd
            text: "Optical Aligment"

    right:
      - icon: github
        href: "https://marcelorosales.github.io/descSPIM_LSmicro/"
      - icon: rss

  sidebar:
    - id: ""

format:
  html:
    theme:
      light: [cosmo, theme.scss]
      dark: [cosmo, theme-dark.scss]
    css: styles.css
    code-copy: true
    code-overflow: wrap
    code-link: true
    toc: true
    include-after-body: js.html
    self-contained: false
    grid:
      sidebar-width: 250px
      body-width: 900px
      margin-width: 300px

editor: source
quarto.yml template-03:
project:
  type: website
  output-dir: docs

website:
  title: "MySite"
  image: "images/img01.png" # where this images goes?. only works with specifit themes?...
  favicon: "images/favicon.png" # Small icon in the bewbrowser tab (ex. uni logo)
  open-graph: true #https://quarto.org/docs/websites/website-tools.html, https://www.youtube.com/watch?v=QwEQKM4YRnU&t=2s
  #twitter-card: true #https://quarto.org/docs/websites/website-tools.html#twitter-cards
  search: true

  navbar:
    background: light # this is the color option of the nav bg, but I set color in format: with theme.scss. # Options:`primary`, `secondary`, `success`, `danger`, `warning`, `info`, `light`, `dark`
    logo: "images/nav_img.png" # logo in nav bar.
    logo-alt: "link to Mkdocs"
    logo-href: "https://marcelorosales.github.io/MkDocsTest1/MkDocs/"
    collapse-below: lg

    left:
      - text: "Home"
        href: index.qmd
      - text: "About"
        href: about.qmd
      - text: "All Notes"
        href: All_notes.qmd

      - text: "Software"
        menu:
          - text: "RStudio"
            href: files/Software/RStudio/index.qmd # when inputing index.qmd doesnt work. Try other file and retry.
          - text: "ImageJ"
            href: files/Software/ImageJ/index.qmd
          - text: "Analyze12"
            href: files/Software/Analyze12/index.qmd
      - text: "Blog"
        href: blog.qmd
      - text: "NavSubmenu"
        menu:
          - text: "Notes & 2do"
            href: files/Notes_2do/index.qmd #In "" because & is not a valid caracter for raw yml
          - text: "Report a Bug"
            icon: "bug"
            href: "https://github.com/quarto-dev/quarto-cli/issues"
          - text: "Ask a Question"
            icon: "chat-right-text"
            href: "https://github.com/quarto-dev/quarto-cli/discussions"
          - text: "FAQ"
            icon: "question-circle"
#            href: docs/faq/index.qmd

    right:
      - icon: github
        href: https://github.com/quarto-dev/quarto-cli
#        text: Quarto GitHub
      - icon: rss
        href: https://quarto.org/docs/blog/index.xml

  sidebar:
    - id: RStudio
      title: "Get Started with the RStudio"
      style: "floating"
      collapse-level: 3
      align: left
      contents:
        - text: R Studio
          href: files/Software/RStudio/index.qmd
        - text: "Install"
          href: files/Software/RStudio/R_install.qmd
        - text: "R Packages"
          href: ""

    - id: ImageJ
      title: "Get Started with ImageJ"
      style: "floating"
      collapse-level: 3
      align: left
      contents:
        - files/Software/ImageJ/index.qmd
        - text: "Install"
          href: files/Software/ImageJ/ImgJ_install.qmd
        - text: "ImgJ Packade"
          href: files/Software/ImageJ/ImgJ_Packages.qmd
        - text: "Git try"
          href: posts/Git.qmd

format:
  html:
    fontsize: ""
    toc: true
    toc-depth: 6
    theme:
      light: [cosmo, theme.scss]
      dark: [cosmo, theme-dark.scss] # change theme (cosmo) colors and formats in the scss files
    code-copy: true
    code-fold: false
    code-overflow: wrap
    code-block-bg: true
    code-block-border-left: "#31BAE9"
#    code-line-numbers: true

    css: styles.css
    include-after-body: js.html
    self-contained: false # If true, it will not create the site files but one html file.
    grid:
      sidebar-width: 250px
      body-width: 900px
      margin-width: 300px
#    tbl-colwidths: [40, 60]  # tables column withs 40% and 60%


filters:
  - lightbox #this section is for the managing img as galleries
lightbox:
  match: auto

editor: source
editor_options:
  markdown:
    canonical: true

#execute:
#  freeze: auto  # This prevent R, Python, and Julia code is only executed locally,
quarto.yml template-04 (comprehensive):
project:
  type: website
  output-dir: docs

website:
  title: "Site_name"
  image: "" # where this images goes?
  favicon: "" # Browsers' tab icon (uni logo)
  open-graph: true
  twitter-card: true
  search: true

  navbar:
    background: light
    logo: ""
    logo-alt: ""
    logo-href: ""
    collapse-below: lg

    left:
      - href: index.qmd
        text: "Home"
      - href: about.qmd
        text: "About"
      - href: blog.qmd
        text: "Blog"

      - text: "Software"
        menu:
          - text: "RStudio"
            href: "" # Ex. files/Software/RStudio/Rstudio.qmd
          - text: "ImageJ"
            href: ""
          - text: "Analyze12"
            href: ""

      - text: "NavSubmenu"
        menu:
          - text: "Notes"
            href: ""
          - text: "Report a Bug"
            icon: "bug"
            href: ""
          - text: "Ask a Question"
            icon: "chat-right-text"
            href: "https://github.com/quarto-dev/quarto-cli/discussions"
          - text: "FAQ"
            icon: "question-circle"
            href: ""

    right:
      - icon: github
        href: "https://marcelorosales.github.io/descSPIM_LSmicro/"
#        text: Quarto GitHub
      - icon: rss
        href: https://quarto.org/docs/blog/index.xml

  sidebar:
    - id: RStudio
      title: "Get Started with the RStudio"
      style: "floating"
      collapse-level: 3
      align: left
      contents:
        - text: R Studio
          href: "" # ex. files/Software/RStudio/index.qmd
        - text: "Install"
          href: ""

    - id: ImageJ
      title: "Get Started with ImageJ"
      style: "floating"
      collapse-level: 3
      align: left
      contents:
        - text: "Install"
          href: ""
        - text: "ImgJ Packade"
          href: ""
        - text: "Git try"
          href: ""


format:
  html:
    fontsize: ""  # "5"
    toc: true
    toc-depth: 6
    theme:
      light: [cosmo, theme.scss]
      dark: [cosmo, theme-dark.scss] # change theme (cosmo) colors and formats in the scss files
    code-copy: true
    code-fold: true
    code-overflow: wrap
    code-block-bg: true
    code-block-border-left: "#31BAE9"
#    code-line-numbers: true
    code-link: true
    css: styles.css
#    include-after-body: js.html
#    self-contained: false # If true, it will not create the site files but one html file.
#    grid:
#      sidebar-width: 250px
#      body-width: 900px
#      margin-width: 300px
#    tbl-colwidths: [40, 60]  # tables column withs 40% and 60%
  docx: default

filters:
  - lightbox # requires install of extension inside the project See "Complete Lightbox Example" post $quarto add quarto-ext/lightbox
lightbox:
  match: auto

editor: source
editor_options:
  markdown:
    canonical: true

#execute:
#  freeze: auto  # This prevent R, Python, and Julia code is only executed locally,
2.2 Create scss files for theme and theme-dark options:
theme.scss
/*-- scss:defaults --*/
$link-color: #39729E;
$text-muted: #6a737b;

// Navigation element colors
$footer-bg: #181818;
$navbar-bg: #EEEEEE ;


/*-- scss:rules --*/

.layout-example {
  background: $gray-500;
  color: $white;
  text-align: center;
  margin-bottom: 1em;
  font-family: $font-family-monospace;
  font-size: .875em;
  font-weight: 600;
  padding-top: 1em;
  border-radius: 3px;
}

.left {
  text-align: left;
  padding-left: 1em;
}

.right {
  text-align: right;
  padding-right: 1em;
}

.hello-quarto-banner h1 {
  margin-top: 0;
  margin-bottom: 0.5rem;
}
theme-dark.scss
/*-- scss:defaults --*/

// Base document colors
$body-bg: #181818;
$body-color: white;
$link-color: #75AADB;

$light: #525252;

// Navigation element colors
$footer-bg: #181818;
$navbar-bg: #303030;


// Code blocks
$code-block-bg-alpha: -.8;

// Bootstrap popovers
$popover-bg: #242424;

// Bootstrap inputs
$input-bg: #242424;
$dropdown-bg: $body-bg;
$dropdown-color: $body-color;
$dropdown-link-color: $body-color;
$dropdown-link-hover-bg: $gray-600;
$dropdown-link-hover-color: white;


/*-- scss:rules --*/

.layout-example {
  background: $gray-700;
}
2.3 Set hltm format and add css created
Original yaml:
format:
  html:
    theme: cosmo
    css: styles.css
    toc: true
Personalized html format in yaml:
format:
  html:
    fontsize: "5"
    toc: true
    toc-depth: 6
    theme:
      light: [cosmo, theme.scss]
      dark: [cosmo, theme-dark.scss] # change theme (cosmo) colors and formats in the scss files
    code-copy: true
    code-fold: false
    code-overflow: wrap
    code-block-bg: true
    code-block-border-left: "#31BAE9"
#    code-line-numbers: true
    css: styles.css
    include-after-body: js.html
    self-contained: false # If true, it will not create the site files but one html file.
    grid:
      sidebar-width: 250px
      body-width: 900px
      margin-width: 300px
# tbl-colwidths: [40, 60] # tables column withs 40% and 60%2.5 Add a .nojekyll file
to the root of your repository that tells GitHub Pages not to do additional processing of your published site using Jekyll (the GitHub default site generation tool). see: Quarto-GitHub Pages
touch .nojekyll3. Render the created page and check status.
Build > Render Web site
Render Q site files:
_site»- .git
.quarto- .Rproj.user
- renv
- styles.css
- _quarto.yml
- .gitignore
- .Rprofile
- renv.lock
- about.qmd
- index.qmd
- Research_Notes_230601.Rproj
4. Connect to GitHub
4.1 In github.com:
Create repo
Github » create new repo » name: » description: » ©Public » © Add readme file » © Add .gitignore: ˇ{R} » © Create repositoryCreate git ignore:
- git ignore R files
- /_site/
Repo settings:
Settings » Pages » Source » ˇBranch: © main » /(docs) » ©save (new page is created)Copy page address:
Got to // Code » code » clone » htpps (copy github page address)Set page address in About:
Go to // Code » About » settings (gear) » website » © use your github website » save changesIn gitignore add:
4.2 Connect Quarto website to Github with:
git init
git config –global init.defaultBranch main # New repos will use "main" as default branch
git branch -m main # changes the name of branch from "master" to "main" git add .
git status
git config –global user.name <MyGitAccount> # (MR)
git config –global user.email <myemail.com> # (hot)
git commit -m "Initial Commit"
git status # (empty)
gedit gitignore (edit gitignore to do not track files…??)
Messages:
(Solved) @ git init: Using ‘master’ as the name for the initial branch. This default branch name is subject to change. To configure the initial branch name to use in all of your new repositories, which will suppress this warning, call:
git config –global init.defaultBranch <main> Names commonly chosen instead of ‘master’ are ‘main’, ‘trunk’ and ‘development’. The just-created branch can be renamed via this command:
git branch -m old-name new-name>_:
git remote add origin <repo_url>message:
! [rejected] main -> main (fetch first)
error: failed to push some refs to ‘https://github.com/~’
git pullmessage:
* [new branch] main -> origin/main
There is no tracking information for the current branch.
Please specify which branch you want to merge with.
What to do when git push is rejected
Solution 1
git pull origin main
git push origin main! [rejected] main -> main (fetch first) error: failed to push some refs to ‘https://github.com/MarceloRosales/descSPIM_LSmicro.git’
Solution 2 (solved)
git push -f origin main # Forces push, careful!! deletes one of the branches (local?/remote?)type github username:
type github Password:
(push from local main branch to remote main branch)
Up to now, there have been conflicts conecting github and local repo; this might help.
Try next time.
See: https://quarto.org/docs/publishing/github-pages.html
Publish Command
The quarto publish command is an easy way to publish locally rendered documents and websites.
Before attempting to use quarto publish (either locally or from a GitHub Action) you should be sure to configure the Source Branch and Ignore Output as described below.
Source Branch
Before attempting to publish you should ensure that the Source branch for your repository is gh-pages (now is main ) and that the site directory is set to the repository root (/) (now main ).
You can modify these options in Settings : Pages for your repository.
git checkout --orphan gh-pages # main?
git reset --hard # make sure you've committed changes before running this!
git commit --allow-empty -m "Initialising main branch"
git push origin gh-pages # main?
Ignoring Output
It’s important to note that you don’t need to check your _site or _book directory into version control (if you have done this in the past you know it makes for very messy diffs!). Before proceeding you should add the output directory of your project to .gitignore. For example:
.gitignore
/.quarto/
/_site/
If you’ve already checked these files into source control you may need to remove them explicitly:
git rm -r _siteSee also Freezing Computations.
4.3 After first commit:
Modify code. (and save files)
Render
git add .
git status
git commit -m "commit message"
git status
git push
git pull
Other git commands:
git reflog (past git logs)
git checkout -b other-branch (Switch to a new branch)
git branch -a (lists of branches)
rm -fr .git (remove git files)
git config --global user.name "MR"
git config --global user.email "...@ho"
git config credential.helper store
git commit -m "1st commit"
git log  # If want to revert to a preview's version, Copy hash click Q to quit.
git checkout {hash copied from log}
git checkout -b {new branch name} # Create a new branch.
git branch {new branch name} {hash} # Create new branch, if revert to previous, add hash
git checkout {branch name} # To change branches
git merge {branch name} # merge [](https://qiita.com/Takao\_/items/5e563d5ea61d2829e497)](https://qiita.com/Takao_/items/5e563d5ea61d2829e497) branch to main
Deploy to github pages:
Settings » Pages » Branch: main, built: docs » save
link address will be display at the top of the GitHub Pages
Github Pages » Your site is live at….
Set address in Repo profile:
Code » About (gear icon) » …[]… » website: use you GitHub Pages website
Add custom domain:
5. Deploy gh-page to Hostinger through git.
There are 2 way of deploying gh pages to web hosts:
- Through webhost cpanel git manager: Uses webhost’s git application.
- Through github action: Uses github itself to push web to any webhost (seems like a better option)
5.1 Through webhost cpanel and git manager
Hostinger and github for beginners:
In github:
- Copy the github url (https): Code » https
Go to Hostinger account:
// Hosting » Manage » © {website name} » Advance » Git » Create a New Repository »
Repository: Paste url
Branch: main
Directory: folder name ex. LSmicro
† If empty it will save in Public folder, if folder name, make sure folder is empty.
© Create
Manage Repository
Auto Deployment
Copy Webhook URL » © Setup webhook on Github » …[]… »
Paste webhook url in the Payload URL section » © Add webhook
† Everytime there is a new update committed it will automatically sync and update page.
j
5.2 Buy a Domain
5.3
Deploy To Shared Hosting With Github Actions
Video support:
How to deploy website from GitHub repository?
How to Point Domain Name to Web Hosting
// Hostinger » websites (prostho2.hostingerapp.com) » Manage » See details » Nameservers » Copy the Nameservers of the website
Nameservers:
- ns1.hostinger.com 31.170.163.241
- ns2.hostinger.com 31.220.23.1
- ns3.hostinger.com 173.192.183.247
- ns4.hostinger.com 31.170.164.249
Go to // Domains » Domain Name (prostho2.com) » Manage » Nameservers » Change » Select Nameservers » Paste Name servers of website » Save
Original Nameservers :
- ns1.dns-parking.com
- ns2.dns-parking.com
WarningYour indicated nameservers are outdated. We will set Hostinger default nameservers:
ns1.dns-parking.com
ns1.dns-parking.comChanging to ns1.hostinger.com fail, and revert to original names.
kjf
How to add a Custom Domain on Github Pages
Add a Domain to Hostinger webpage
1. Buy a Domain
// Hostinger » domains » get a new domain
or if you have a domain: Move a Domain Between Different Hostinger Accounts
Q. Regarding the domain, is the .click a reliable domain? or better to go for .com?
A. Both of the extension domain name in .click or .com is reliable.
But the more popular extension domain name is .com and most used one. So it will be better for SEO as well.
Q. How about prices?
My reseller is in hostinger.com. So the price of renewal domain will be :
.online : 0.99$ 1st year then $34.99 + tax
.com : 1.99$ 1st year then $14.99 + tax
All will be in USD.
next
My domain prostho2.com is not yet added to your hosting plan, so please add it first and copy the website from prostho2.hostingerapp.com to prostho2.com.
Please follow this step-by-step process:
1. Add website to the hosting plan (create new website):
To add a domain to your account, please go to Hosting → Add Website.
You can follow the steps, described in this article: How to add a website to hostinger.
While creating the site, set the domain to prostho2.com
2. Copy the website to the new domain (website)
If your old website is using WordPress, you can move WordPress website to another domain name or subdomain you can do so easily with the Copy website feature of your hPanel! Just follow this guide:
How to Copy a WordPress Website to Another Domain Name
Before starting, it is recommended to back up the content of your destination domain in case it’s not empty, as it will be overwritten. Subdomains on your destination domain will stay unchanged 😊
If your website is using another CMS, this tutorial will be helpful:
How to Move a Website’s Content to Another Domain Name
3. Change your hosting main domain to the new domain
If you wish to remove the old domain, a new domain must be assigned as the new main domain. More information can be found here: How to change the main domain of your hosting account
Keep me updated on how it goes and let me know if you have any questions.
Now the new site is link to the new domain.
Add sub-domain in Hostinger
It is possible to add Sub domains to your domains!!!
A subdomain is a part of a larger domain name. It is used to organize and categorize different sections or subdivisions of a website. Subdomains are created by adding a prefix to the main domain name, separated by a dot (period). For example:
Main Domain: example.com
Subdomain: blog.example.com
In this example, “example.com” is the main domain, and “blog” is the subdomain. The subdomain acts as a separate entity within the main domain and can have its own content, functionality, and organization.
Subdomains are commonly used for various purposes, such as:
- Organizing content: Websites may use subdomains to categorize different sections or types of content. For example, a blog section can be assigned the subdomain “blog.example.com,” while an e-commerce section can use “shop.example.com.”
- Multilingual sites: Subdomains can be used to create versions of a website in different languages. For instance, “fr.example.com” for the French version and “es.example.com” for the Spanish version.
- Separate services: Subdomains can be used to host separate services or applications associated with the main website. For instance, “mail.example.com” for email services or “app.example.com” for a web application.
- Testing and development: Subdomains can be utilized for testing and development purposes. Developers often create subdomains like “dev.example.com” or “staging.example.com” to work on new features or test changes before deploying them to the main website.
It’s important to note that subdomains are part of the overall domain name hierarchy, and they can be treated as separate entities for hosting, DNS configuration, and website organization. Each subdomain can have its own content, separate FTP access, or different configuration settings.
Is quite simple:
// Hostinger » dashboard » Domains » Sub-domains » Create a new sub-domain » Enter sub-domain {name} » © Custom folder for sub-domain {name} » © Create …[ ]…
In the lis of current sub-domains a new sub-domain will be created with the link subdomain.domain.com. ex. lsmicro.prostho2.com and is live…
A new folder is created in Public_html (Custom folder for sub-domain {name}), place your code for the page there and it will available online.
Deploy with Github Actions
Deploy To Shared Hosting With Github Actions
Create webpage code (.html)
Create a “.github/wokflows/” folders and 2 .yml files
- master.yml or main.yml ( branch_name.yml)
- staging.yml
Search for the ftp-deploy code (from github marker: ftp, deploy sort:popularity-desc)
- Code the git actions for each yml files (each branch separately) .
- Use model: FTP Deploy, By SamKirkland. Automate deploying websites and more with this GitHub action via FTP and FTPS. 2.7k stars. FTP Deploy (SamKirkland)
on: push
name: 🚀 Deploy website on push
jobs:
  web-deploy:
    name: 🎉 Deploy
    runs-on: ubuntu-latest
    steps:
    - name: 🚚 Get latest code
      uses: actions/checkout@v3

    - name: 📂 Sync files
      uses: SamKirkland/FTP-Deploy-Action@v4.3.4
      with:
        server: ftp.samkirkland.com
        username: myFtpUserName
        password: ${{ secrets.ftp_password }}
---
Modify code to:
on:
  push:
    branches:
      - main
name: 🚀 Deploy website on push
jobs:
  web-deploy:
    name: 🎉 Deploy
    runs-on: ubuntu-latest
    steps:
    - name: 🚚 Get latest code
      uses: actions/checkout@v3

    - name: 📂 Sync files
      uses: SamKirkland/FTP-Deploy-Action@v4.3.4
      with:
        server: ftp.example.com
        username: ${{ secrets.ftp_username }}
        password: ${{ secrets.ftp_password }}
#        server-dir: /public_html/LSmicro.prosth2.com # domain or subdomain
        local-dir: ./docs/
        remote-dir: ./public_html/lsmicro/ # or subdomain folder
Perhaps this code will be better. C-GPT: write an ftp deploy code for github actions.
name: FTP Deploy

on:
  push:
    branches:
      - main

jobs:
  web-deploy:
    name: 🎉 Deploy
    runs-on: ubuntu-latest

    steps:
      - name: Checkout Repository
        uses: actions/checkout@v3

      - name: FTP Deploy
        uses: SamKirkland/FTP-Deploy-Action@v4.3.4
        with:
          server: ftp.example.com
          username: ${{ secrets.FTP_USERNAME }}
          password: ${{ secrets.FTP_PASSWORD }}
          local-dir: ./docs
          remote-dir: /public_html/docs # or subdomain folder
Alternatively, in python. C-GPT: write ftp deploy code for the docs folder.
import os
from ftplib import FTP

# FTP server credentials
ftp_host = "ftp.example.com"
ftp_username = "your_ftp_username"
ftp_password = "your_ftp_password"

# Local path to the "docs" folder
local_path = "/path/to/docs"

# Remote path on the FTP server where the "docs" folder will be uploaded
remote_path = "/public_html/docs"

# Function to upload a directory and its contents recursively
def upload_directory(ftp, local_dir, remote_dir):
    if not os.path.exists(local_dir):
        return

    ftp.cwd(remote_dir)
    for item in os.listdir(local_dir):
        local_item = os.path.join(local_dir, item)
        if os.path.isfile(local_item):
            with open(local_item, "rb") as f:
                ftp.storbinary("STOR " + item, f)
        elif os.path.isdir(local_item):
            ftp.mkd(item)
            upload_directory(ftp, local_item, item)
    ftp.cwd("..")

# Connect to the FTP server
ftp = FTP(ftp_host)
ftp.login(user=ftp_username, passwd=ftp_password)

# Upload the "docs" folder recursively
upload_directory(ftp, local_path, remote_path)

# Close the FTP connection
ftp.quit()
If repository not yet created:
Create git ripo
github quick setup, ` git init » git add. »
git init git add . git commit -m "first commit" git remote add origin https://github.com/my_github/myrepo.git git push origin master- Git will sync files and forlders. (first commit will fail).
- Go to git » Actions. first commit will fail… because secrets are not define.
Set github secrets
Define secrets, go // Settings » Secrets and variables » Actions » New repository secret » (create 2 secrets)…
- Secret 1
Name: ftp_username
Value: yourusername ex. lsmicro or u567637261.lsmicro ?
u567637261.descsimp.online ?
Add secret
- Secret 2
- Name: ftp_password
- Value: yourpass word (for ftp) ex. LSmicro23
- Add secret
- Secret 1
Go Actions again » © first commit » © Re-run jobs » Re-run all jobs
Click on deploy to see all details.
Create a new branches.
- Git create branch “Staging” ????
- Return to master/main
checkout to master? (allways retun to master/main to create new branches. git crate branch newfeature???- modify/add code to page…
git add .git commit -m "new feature"git push origin newfeature- Go back to github repo » Actions… Here no update was performed because changes are updated only when pushed to master/main or staging (here we are pushing to “newfeature”
- Change branch form newfeature to stagin
git checkout staging - Merge newfeature for staging branch
- While in “staging” branch
git merge newfeature git push origin staging- Now in github acction the update/sync/deployed will be shown.
Add modify code as needed. Add, commit, and push to staging. If the new feature is completed and finally approved, merge with master/main branch.
Check more ftp options
- If r
Create FTP account
How to create an FTP Account access and upload using ….
Active hostname: ftp.descsimp.online
Directory: /home/u567637261/domains/descsimp.online/public_html/lsmicro
Username: u567637261.lsmicro
username: lsmicro
Pass: LSmicro23
How to Move a Domain Between Different Hostinger Accounts
Domains:
- prostho2.com
- descsimp.online
- prostho2.hostingerapp.com (old, deprecated)
- websitein.hol.es (old, deprecated)
Sub-domains:
- lsmicro.prostho2.com: (/home/u567637261/domains/prostho2.com/public_html/LSmicro)
- lsmicro.descsimp.com: (/home/u567637261/domains/descsimp.online/public_html/LSmicro)
FTP Accounts:
- descsimp:
FTP Access:
FTP IP: ftp://31.220.106.221
FTP hostname: ftp://prostho2.hostingerapp.com
FTP username: u567637261.descsimp.online
FTP IP ftp://31.220.106.221 FTP hostname ftp://prostho2.hostingerapp.com FTP username u567637261.descsimp.online FTP port 21 Folder to upload files public_html Forgot your FTP password? Change FTP password Recommended FTP clients SmartFTPorFileZilla hostname: ftp.descsimp.online
directory: /home/u567637261/domains/descsimp.online/public_html/lsmicro
username: u567637261.lsmicro
Password: LSmicro23
- descsimp:
GIT (Dashboard / advanced)
Repository Branch Install Path Actions https://github.com/MarceloRosales/descSPIM_LSmicro.git main /public_html/lsmicro/ - Deploy
- View latest build output
- Auto Deployment
Deploy from GitHub repository
- Hostinger » Advanced » GIT
- Create new repository:
- Repository: https://github.com/MarceloRosales/descSPIM_LSmicro.git or git@github.com:MarceloRosales/descSPIM_LSmicro.git
- Branch: main
- Directory: LSmicro
- Create directory in hostinger “/public_html/lsmicro/” (make sure dir is empty)
- Add ssh key (before clicking deploy button)
- Generate SSH key
- Copy key
- Go back to github » Settings » deploy keys » add deploy key » paste key » add title: lsmicro »
- Un-check
Allow write access(i want just to copy files to deploy only hostinger) » - © Add key
- SSH hostinger-descsimp.online
SHA256:hVtC0LQ00kEpo2alhWxaxDbhz0vM/+7jJ1hDQyvweo8
- Un-check
- Go back to hostinger Git » Manage Repositories » © deploy » Yes
- Enable Automated deployments:
- click on “Auto deployment”
- Copy the webhook URL » © setup webhook on Github » …[github » settings » Webhooks »]…
- Paste URL in “Payload URL” » © Add webhook
- Now everytime you push content to github it wll automatically be deployed.
End
Core-shell 01
Now I am going to recreate the whole process in one go from scratch.
FTPtest01:
Note: it is easyer to create the repository in github first and then clone it to local (but it is better to know the process of creating the page first and then connecting to the github).
Requirements before starting:
- Have a web hosting service (now using Hostinger.com ~80$y )
- Have a domain
prostho2.com, 3 years, ID: 169kGMTjEV0XCrNF
Auto-renew on, Renewal date: 2026-06-09
price: $10 (first year), Renewal price: $45.51…? (not ~$15?)
descsimp.online, 1 year, ID: Azq9UZTivX2bpNrZ0
Auto-renew off, Expiration date: 2024-07-04
price: $1 (first year), Renewal price $35.17
Main steps:
- Create quarto website (local) repo
- Create github repo.
- Connect local and github repo
- Create sub-domain in Hostinger (with sub-folder)
- Create new ftp account in Hostinger
- Delete all files in sub-folder
- Set GitHub secrets
- Create Git Actions / workflows (deploy & control)
- Render and Test actions
Description:
create quarto (local) repo
file new project » New directory » Quarto website » FTPtest01; ©create git repo; ©use renv for this project » create project
Open the _quarto.yml » in “project” type:
output-dir: docsor… for fast deployment copy/paste
_quarto.yml template 04.Create scss files for theme and theme-dark options Copy/paste file:
scss_files <- "/Users/marcelorosales/Box Sync/Github/QuartoFiles"
system(paste("open", shQuote(scss_files)))
To avoid the light-box filter error, install the lightbox extension inside the project folder itself. It is required for function of lightbox. (see Complete Lightbox Example post for more details)
quarto add quarto-ext/lightboxBetter Not Render project to create the website until the end, normally a _site folder will is created but we changed output-dir: docs, so /docs folder will created instead and will be used to deploy the site in github.
create github repo.
- New repository » FPTtest01 » ©public » create repository
git ignore files: R,
Add
/_site/to .gitignore after creating the fileAdd a .nojekyll file
to the root of your repository that tells GitHub Pages not to do additional processing of your published site using Jekyll (the GitHub default site generation tool). see: Quarto-GitHub Pages
touch .nojekyllAdd other files or dir as necessary
- Settings » Pages » Branch: main; /docs » save
- set address in About (info) Got to // Code » code » clone » htpps (copy github page address)
- New repository » FPTtest01 » ©public » create repository
connect local and github repo github quick setup.
in github » code » copy https address » https://github.com/name/FTPtst01.git
In terminal:
git remote add origin https://github.com/MarceloRosales/FPTtest01.git
git branch -M main
git pull
git push -u origin main

# error: src refspec main does not match any
# error: failed to push some refs to 'https://github.com/MarceloRosales/FPTtest01.git'
# This is (probably) because there is no previous commits to match with.


git add .
git commit -m "fist commit"
git push -u origin main
# git pull
# git branch --set-upstream-to=origin/main
git push --set-upstream origin main
git config pull.rebase false

git push -f origin main #this seems to solve the probelm

#  ----- may not need this code

git pull
# There is no tracking information for the current branch.
git add .
git commit -m "second commit"
git push
# fatal: The current branch main has no upstream branch.
git push --set-upstream origin main

# add text and render
git add .
git commit -m "second commit"
git push
git status

# Success!!!!
Comments:
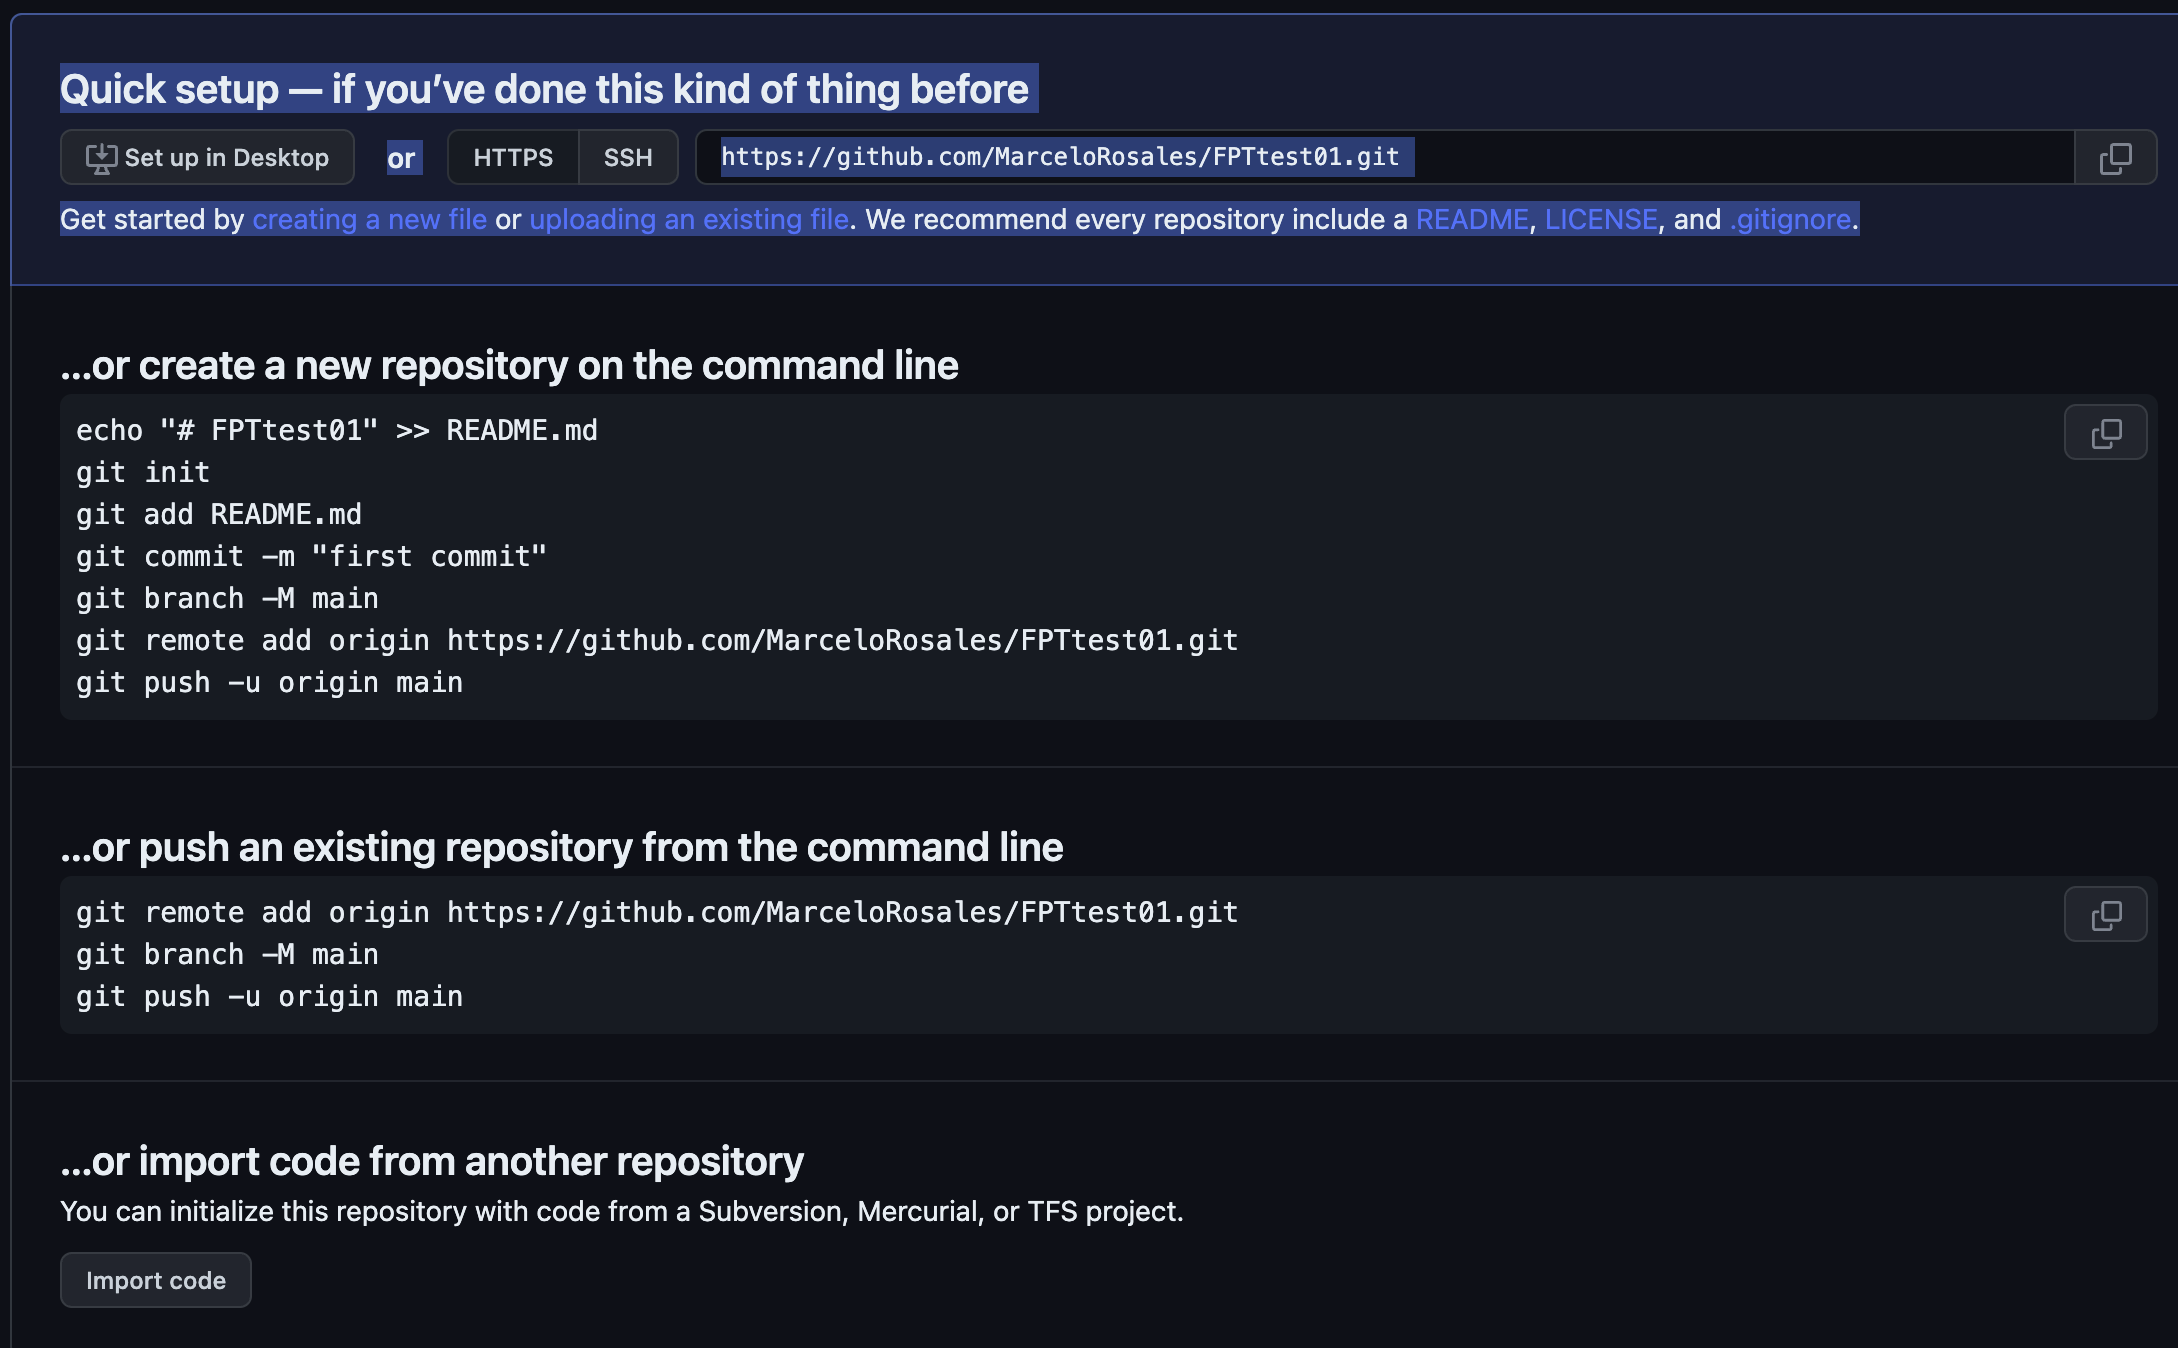
new github repo message:
Quick setup — if you’ve done this kind of thing before or
https://github.com/MarceloRosales/FPTtest01.git
Get started by creating a new file or uploading an existing file. We recommend every repository include a README, LICENSE, and .gitignore.
…or create a new repository on the command line
echo "# FPTtest01" >> README.md
git init
git add README.md
git commit -m "first commit"
git branch -M main
git remote add origin https://github.com/MarceloRosales/FPTtest01.git
git push -u origin main
…or push an existing repository from the command line
git remote add origin https://github.com/MarceloRosales/FPTtest01.git
git branch -M main
git push -u origin main
…or import code from another repository
You can initialize this repository with code from a Subversion, Mercurial, or TFS project.
create subdomain in hostinger.
Home » Premium Web Hosting » Manage » ©[descsimp.online] » ˇDomains » Subdomains » Enter Subdomain:
Sub_name» ©Custom folder for subdomain:Sub_name» Createcreate a new ftp account in hostinger
Home » Premium Web Hosting » Manage » ©[descsimp.online] » ˇFiles » FTP Accounts » Create a new FTP Account » Directory: /public_html/
Sub_name/» Username:Sub_name» Password: LSmicro23 » Create- Username: ResearchNotes; A愛2
subfolder is created in hostinger with a php file, with manager delete all files and make sure is empty
Set secrets in github
- Define secrets, go // Settings » Secrets and variables » Actions » New repository secret » (create 2 secrets)…
- FTP_username (lsmicro or u567637261.lsmicro ?
- u567637261.descsimp.online ?
- u567637261.FTPtest01
- u567637261.ResearchNotes
- FTP_password
- LSmicro23
- ”
- A愛2
- FTP_username (lsmicro or u567637261.lsmicro ?
- Define secrets, go // Settings » Secrets and variables » Actions » New repository secret » (create 2 secrets)…
Create Git Actions / workflows (deploy & control yml)
This link here creating your first workfolow was the key to unlock the problems of FTP deployment. There is a demo to check if actions are working.
create folder .github/workflows/
mkdir -p .github/workflows/Create ftpdeploy.yml (set server: ftptest01.descsimp.online [subdomain!!] and change remote-dir: …)
cd .github/workflows/ touch ftpdeploy.yml github-actions-demo.yml # for serial files # touch file_name{0001..0003}.txtname: 🚀 FTP Deploy on: push: branches: - main jobs: web-deploy: name: 🎉 Deploy runs-on: ubuntu-latest steps: - name: Checkout Repository uses: actions/checkout@v3 - name: FTP Deploy uses: SamKirkland/FTP-Deploy-Action@v4.3.4 with: server: ftptest01.descsimp.online # Subdomain name. !!NOT: FTP Accouns » Active hostname.. See: //Hosting » Dashboard » Domains » Subdomains » List of current subdomains username: ${{ secrets.FTP_USERNAME }} # Set in github password: ${{ secrets.FTP_PASSWORD }} # Set in github local-dir: ./docs/ remote-dir: ./public_html/FTPtest01/ # or subdomain folderCreate github-actions-demo.yml as control…
name: GitHub Actions Demo
run-name: ${{ github.actor }} is testing out GitHub Actions 🚀
on: [push]
jobs:
  Explore-GitHub-Actions:
    runs-on: ubuntu-latest
    steps:
      - run: echo "🎉 The job was automatically triggered by a ${{ github.event_name }} event."
      - run: echo "🐧 This job is now running on a ${{ runner.os }} server hosted by GitHub!"
      - run: echo "🔎 The name of your branch is ${{ github.ref }} and your repository is ${{ github.repository }}."
      - name: Check out repository code
        uses: actions/checkout@v3
      - run: echo "💡 The ${{ github.repository }} repository has been cloned to the runner."
      - run: echo "🖥️ The workflow is now ready to test your code on the runner."
      - name: List files in the repository
        run: |
          ls ${{ github.workspace }}
      - run: echo "🍏 This job's status is ${{ job.status }}."
render and commit
Check actions in github. Actions » All workflows » FTP Deploy (green check means success!!)
Save all and start pages content.
To create a blog:
Add the menu in the navbar section of the _quarto.yml file
      - href: blog.qmd
        text: "Blog"
Create blog.qmd file and a posts folder.
touch blog.qmd
mkdir posts
In the blog.qmd file add the head yml code:
title: "Blog"
listing:
  contents: posts # Contents will be taken from the posts folder
  sort: "date desc"
  type: default
  categories: true
page-layout: full
#margin-header: signup.html
title-block-banner: "#EDF3F9"
title-block-banner-color: body
search: false
This file is the the “main page” or “landing page” for the blogs.
All subsequent blog files need to be saved in the posts folder.The yml in this file will direct to the folder and the way is displayed. In other words, the yml section, the listing for this page comes from the contents in the folder posts…“contents: posts”
Q: For organization convenience… Can I place this landing page file directly into the posts folder? No, the posts will be displayed in this page.
Each blog post should have the proper yaml heading:
Create a .qmd file within the /posts folders.
cd posts
touch file_name.qmd
Simple example:
title: "Minimal post"
description: "Post description"
author: "Marcelo Rosales"
date: "2023/03/13"
categories:
  - news
  - code
  - analysis
Example with lightbox filters, and html format
title: "Complete Lightbox Example"
description: "How to use Lightbox"
author: "Marcelo Rosales"
date: "2023/03/13"
categories:
  - photos
  - lightbox
  - gallelry
filters:
  - lightbox
lightbox:
  match: auto
  effect: fade
  desc-position: right
  loop: true
#  css-class: "my-css-class" #only if custom css file exists.
format:
  html:
    code-fold: true
    code-copy: true
    code-overflow: wrap
Editor: Source
There are also specific templates, ex. Jolla template:
title: "Jolla template"
description: "quarto templates"
author: "Marcelo Rosales"
date: "2023/03/16"
categories:
  - quarto
  - code
  - templates

about:
  id: hero-heading
  template: jolla
  image: images/img01.png
  links:
    - icon: twitter
      text: twitter
      href: https://twitter.com
    - icon: github
      text: Github
      href: https://github.com
l
Other References:
How to manage DNS Records at Hostinger
Managing a custom domain for your GitHub Pages site
Compare the Best Domain Hosting of 2023
How to create an FTP account in Hostinger and upload with Filezilla?